Studying mushroom spores under the microscope is a fascinating and rewarding hobby. You don’t need a full lab to get started, just the right kit and a clean setup.
We have compiled simple, step-by-step instructions to guide you in studying spores under a microscope. This is the process we use to validate the viability and cleanliness of our spore syringes before they are sold.
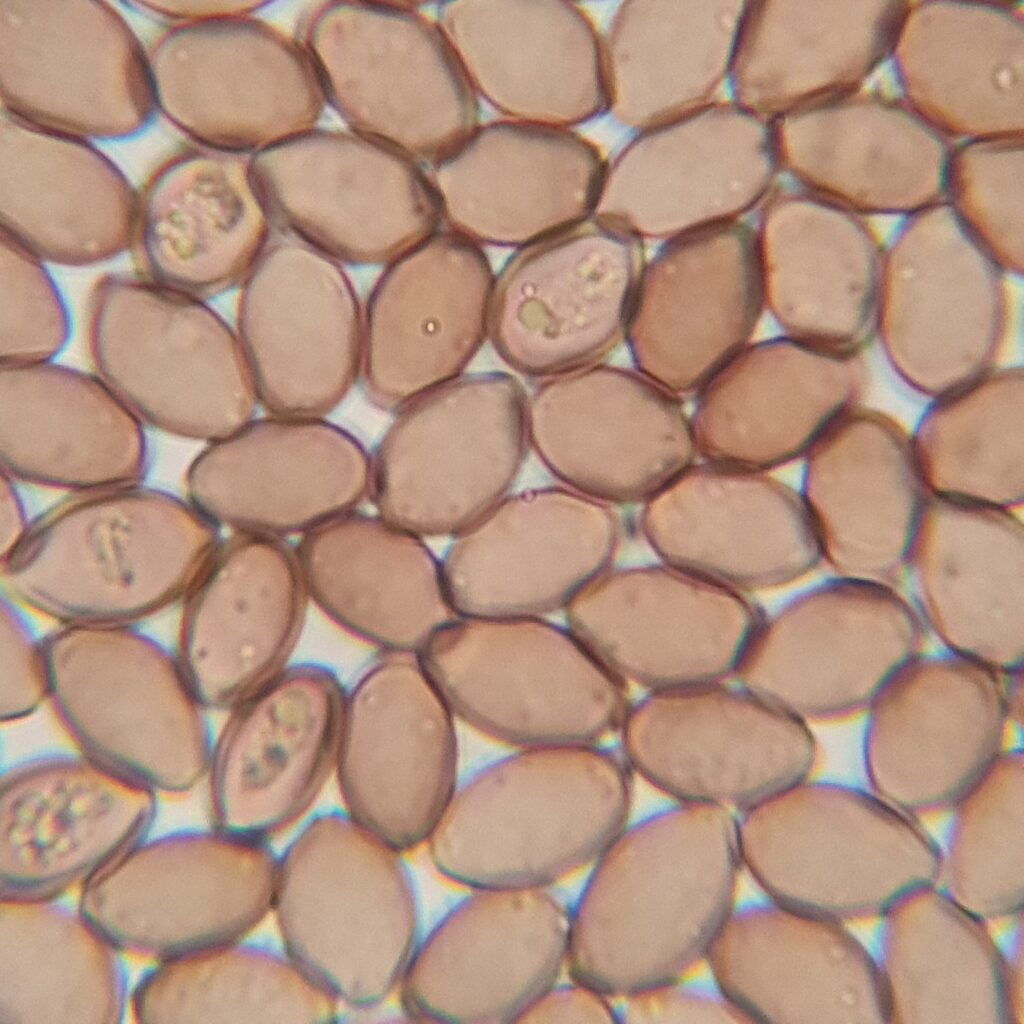
Psylocybe Cubensis Golden Teacher spores, 1000x magnification with immersion oil. Credit: ōM Scientific 2025
Essential Equipment
Microscopy Equipment
- Compound microscope (400x–1000x magnification)
- Glass microscope slides
- Coverslips
- Immersion oil (for 100x oil lens, if used)
- Lens tissue or soft cloth
Handling Tools
- Spore syringe
- 70% isopropyl alcohol
- Haemocytometer (for spore counts)
- Eyepiece reticle + stage micrometer (for measuring)
- Tweezers (optional)
Sterility and Environment
- Still Air Box (SAB) or laminar flow hood
- Nitrile/latex gloves
- Surgical or FFP2 mask
- Paper towels
- Optional: Butane lighter or spirit lamp (for flaming syringe tip)
Preparing Your Workspace
Working under a laminar flow hood or in a clean room is the most effective way to maintain sterility in all procedures, but we understand that not everyone has access to these options. The next best technique is to use a Still Air Box (SAB).
Always ensure you are wearing clean clothes and have clean hands. The cleaner everything is, the better your chances of success.
Still Air Box Setup
It is essential to work in a SAB to avoid dust and floating spores from the air, which can compromise your slide or yield false contamination results even when the spore solution is, in fact, clean. If sterility isn’t your priority, you can skip this step.
- A Still Air Box (SAB) is a sealed, clear plastic container with two armholes. It has no airflow, which helps to prevent dust and spores from circulating.
- Wipe the inside of the SAB thoroughly with 70% alcohol before each use.
- Prepare your spore syringe by shaking it up to distribute the spores evenly. Spores may become stuck in the needle if clumps are present. A good way to distribute spores evenly is to place them on a vibrating surface (like your phone) for a few minutes. We place the syringes we sell on a commercial vibrating plate to break up any clumps before sending them to customers. However, some spores will clump together again relatively quickly, depending on the strain.
- Give your materials a quick wipe with 70% alcohol and place them inside the SAB: spore syringe, slides, coverslips, and alcohol wipes.
- Wash your hands thoroughly and put on gloves.
- Spray/wipe your gloves with 70% alcohol before entering SAB.
- Work slowly inside the SAB to avoid air turbulence.
Slide Preparation
You’re only dealing with a very small drop of solution, but this part matters. The goal is to get a clean, evenly spread sample under the coverslip, without air bubbles or flooding.
- Shake the syringe to suspend spores evenly; they settle fast.
- Remove the cap and attach a sterile needle.
- Expel a tiny drop (about the size of a sesame seed) of spore solution directly onto the centre of a slide.
- Replace the cap on the needle (don’t remove the needle). Next time you use the needle, ensure you flame sterilise it before use.
- Hold the coverslip by the edge with sterile tweezers or gloved hands and lower it at a slight angle so that it touches one edge of the droplet first. Then, gently let it fall flat.
- Remove the prepared slide from the SAB carefully.
- Label the slide to keep track of your work (species/date/source)
We recommend preparing several slides at a time. Spores notoriously clump together and disperse unevenly, sometimes making them difficult to find in a tiny drop of solution. – Don’t worry, we guarantee there are thousands of them in every syringe.
Microscope Setup and Viewing
This is where the magic happens, and where many people get stuck. Here’s how to get a clear view of your spores without wasting time or wrecking your slide.
Step-by-Step Viewing Process
- Put your slide on the stage with the coverslip facing up, and secure it with the stage clips. Begin with the 4X objective lens, raise the stage towards the lens using the coarse focus knob until you see the spore droplet.
- Switch to the 10X objective. Again, use the coarse focus knob to bring the sample roughly into view, and then fine-tune the focus to sharpen the image.
- Progress to the 40X objective. At this magnification, you will still need to carefully adjust with the coarse focus knob to find the exact focal point, followed by fine focus. Spores should start appearing as scattered or overlapping oval or round shapes. If no spores are visible, recentre the droplet and try again.
- For the highest magnification, use the 100X oil immersion objective. Place a small drop of immersion oil on the coverslip directly above the droplet, then rotate the 100X lens into place so it touches the oil. Carefully use the coarse focus knob to bring the spores into rough focus; small movements are key at this magnification. Then, fine–tune the focus until the image is sharp. Avoid making fast or large adjustments with the coarse focus to prevent damage to your slide or lens.
What should spores look like?
When you’re looking at spores under the microscope, you’re looking at the shape, colour, texture, and condition. These details can help you confirm the species, check the quality, or identify potential contamination. Here’s what to expect (and what to question):
Psilocybe Species
- Shape: Typically elliptical (oval) to subrhomboid (rounded diamond shape), often slightly asymmetrical.
- Surface: Smooth and uniform, with no visible ornamentation.
- Germ pore: Often visible as a slight flattening or light spot at one end of the spore. Only visible with 1000X oil immersion.
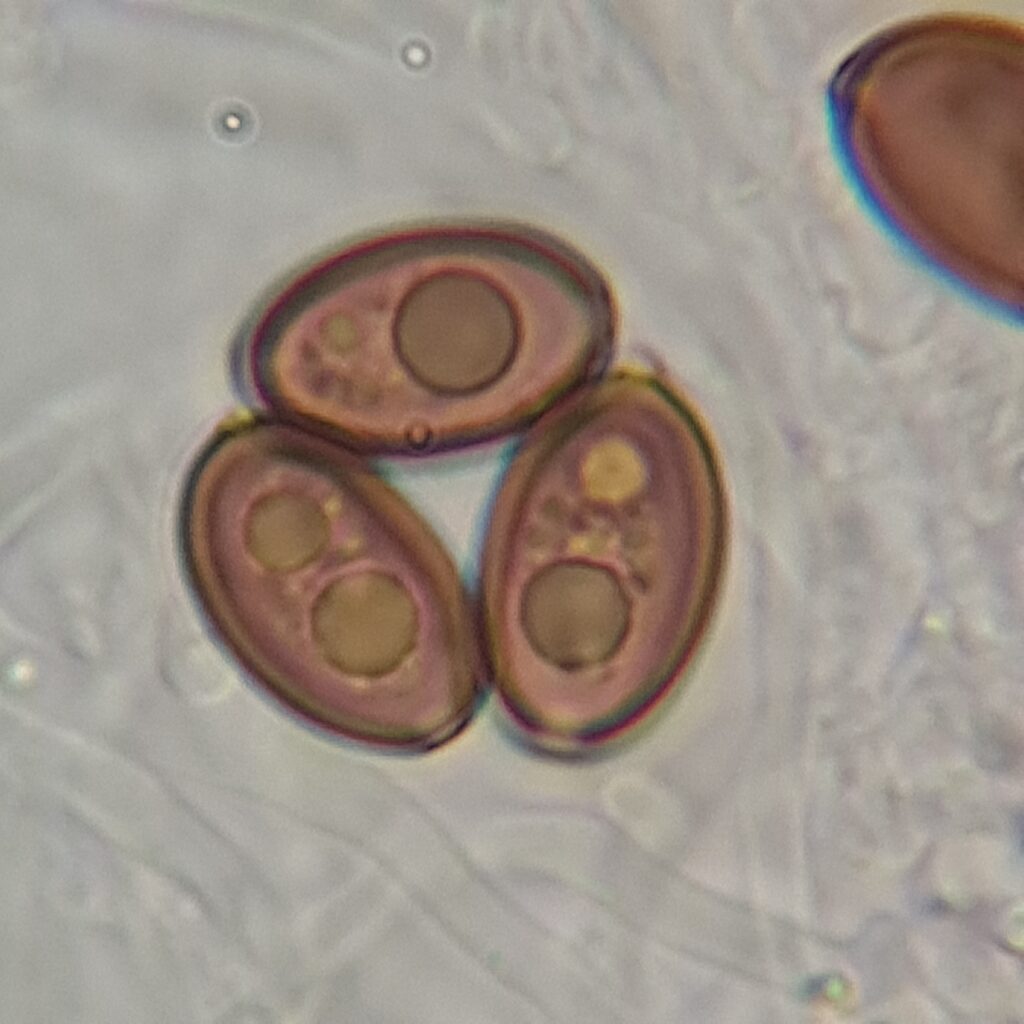
Psylocybe Cubensis Golden Teacher Spores, 800X/1000X Magnification with immersion oil. Credit: ōM Scientific 2025
Panaeolus Species
- Shape: More spherical or almond-shaped (sometimes slightly flattened at one end).
- Surface: Smooth, clean edges, and often slightly darker than Psilocybe.
- Clumping: Spores may cluster more tightly due to their darker pigmentation and smaller size.
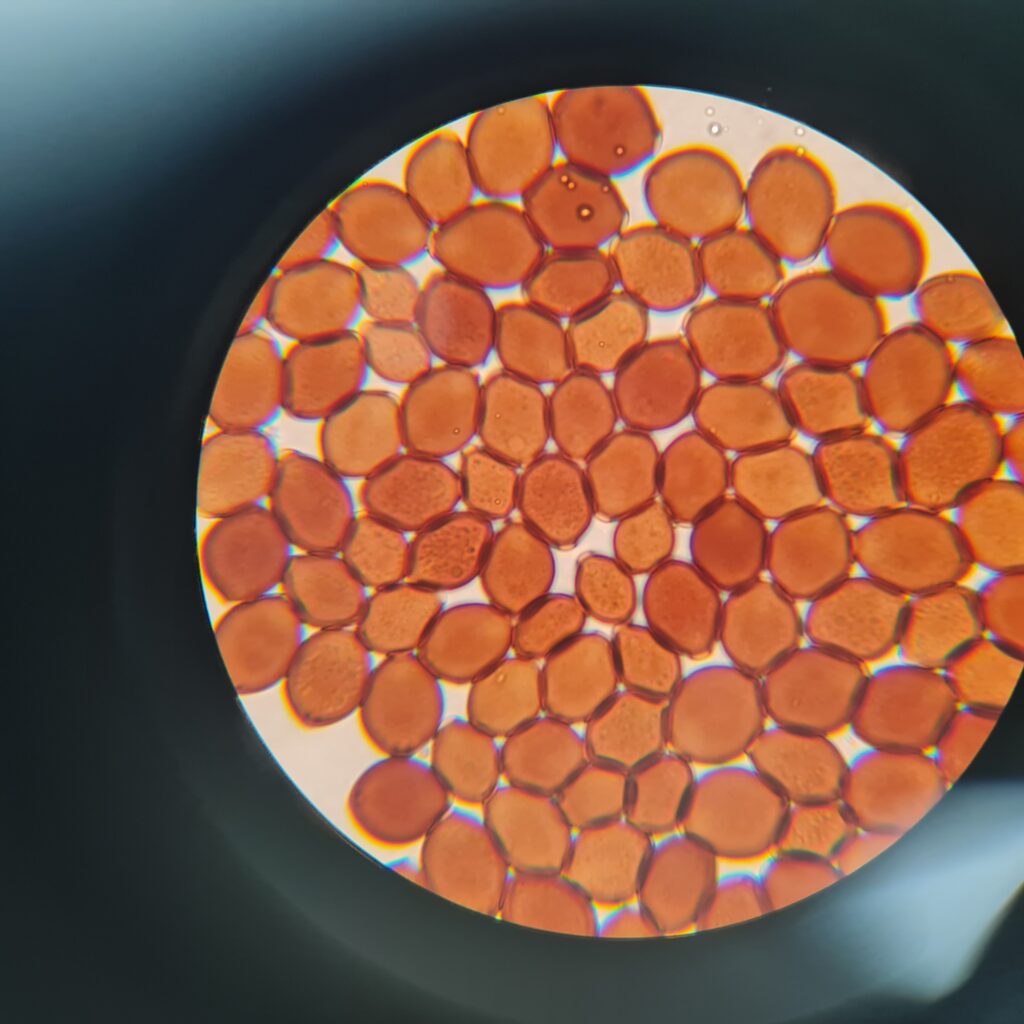
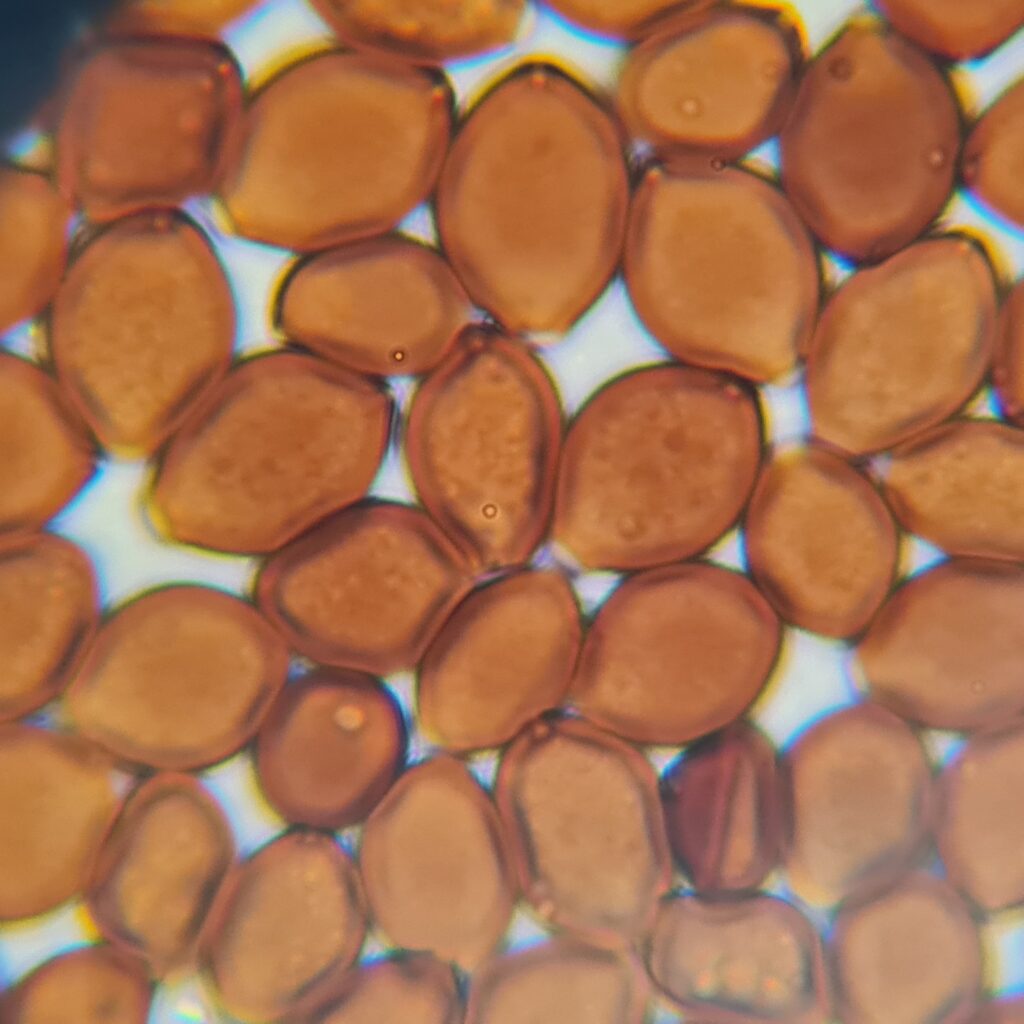
Panaeolus Cyanescens Australian Red Down Under Spores, 800X/1000X Magnification with immersion oil. Credit: ōM Scientific 2025
Healthy Spores
- Consistent shape and size – you should see a relatively uniform population.
- Defined outer edge – a clean, unbroken line forming the spore wall.
- Stable in solution – they may drift slightly, but won’t dart or twitch like bacteria.
Unhealthy Spores
- Faded colour – pale, greyish, or nearly invisible spores may be old or improperly stored.
- Shrivelled or collapsed shape – indicates they’ve dried out or degraded.
- Ghost spores – faint, almost transparent shapes with little to no internal structure.